Deep Dive into Web Automation
Web automation is one of the most common applications of RPA. Beyond external information gathering, virtually all software and information systems used by modern enterprises are deployed as websites, and small-to-medium businesses heavily adopt SaaS services. The problems solved range from marketing, sales, HR, legal, to finance — therefore, RPA capability largely depends on its web automation capabilities.
How It Works
Most RPA solutions require users to install a browser extension to control the browser. This extension can see the webpages in the user's browser and receive commands from the RPA software to inject code into webpages. However, as browser security and privacy requirements continue to increase, extension permissions are being continuously restricted, limiting web automation capabilities — and frequently causing automation failures due to browser version updates. On the other hand, letting RPA control the user's everyday browser increases the risk of exposing websites that shouldn't be automated, and even raises concerns about malicious control — for example, personal online banking.
To thoroughly solve this problem, EMILY.RPA has a built-in Chromium browser engine. It achieves web automation without requiring the user's Chrome, Edge, Firefox, or other browsers, and provides a rich set of tools to simplify workflow design. Because it is separate from the user's everyday browser, websites that the user has never logged into via EMILY.RPA have no risk of information leakage or being manipulated.
Web Automation Toolset
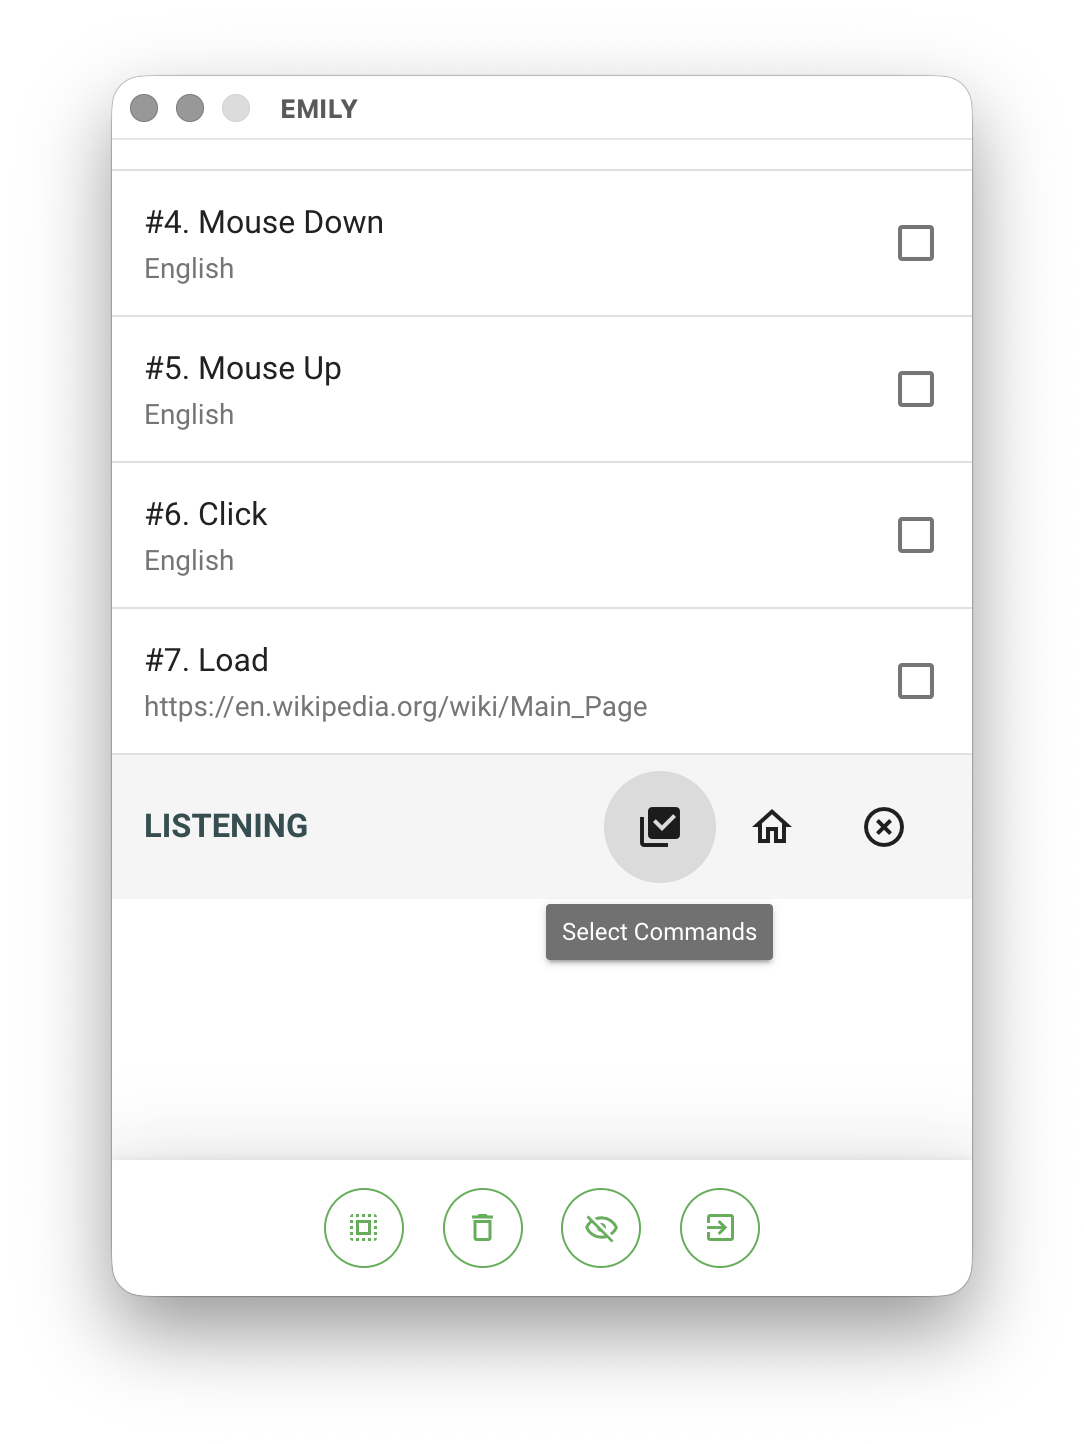
The icon area at the bottom of the Training Mode main interface provides various tools. Except for "Back to Design Home" and "Working Folder", all tools record corresponding commands in the workflow.
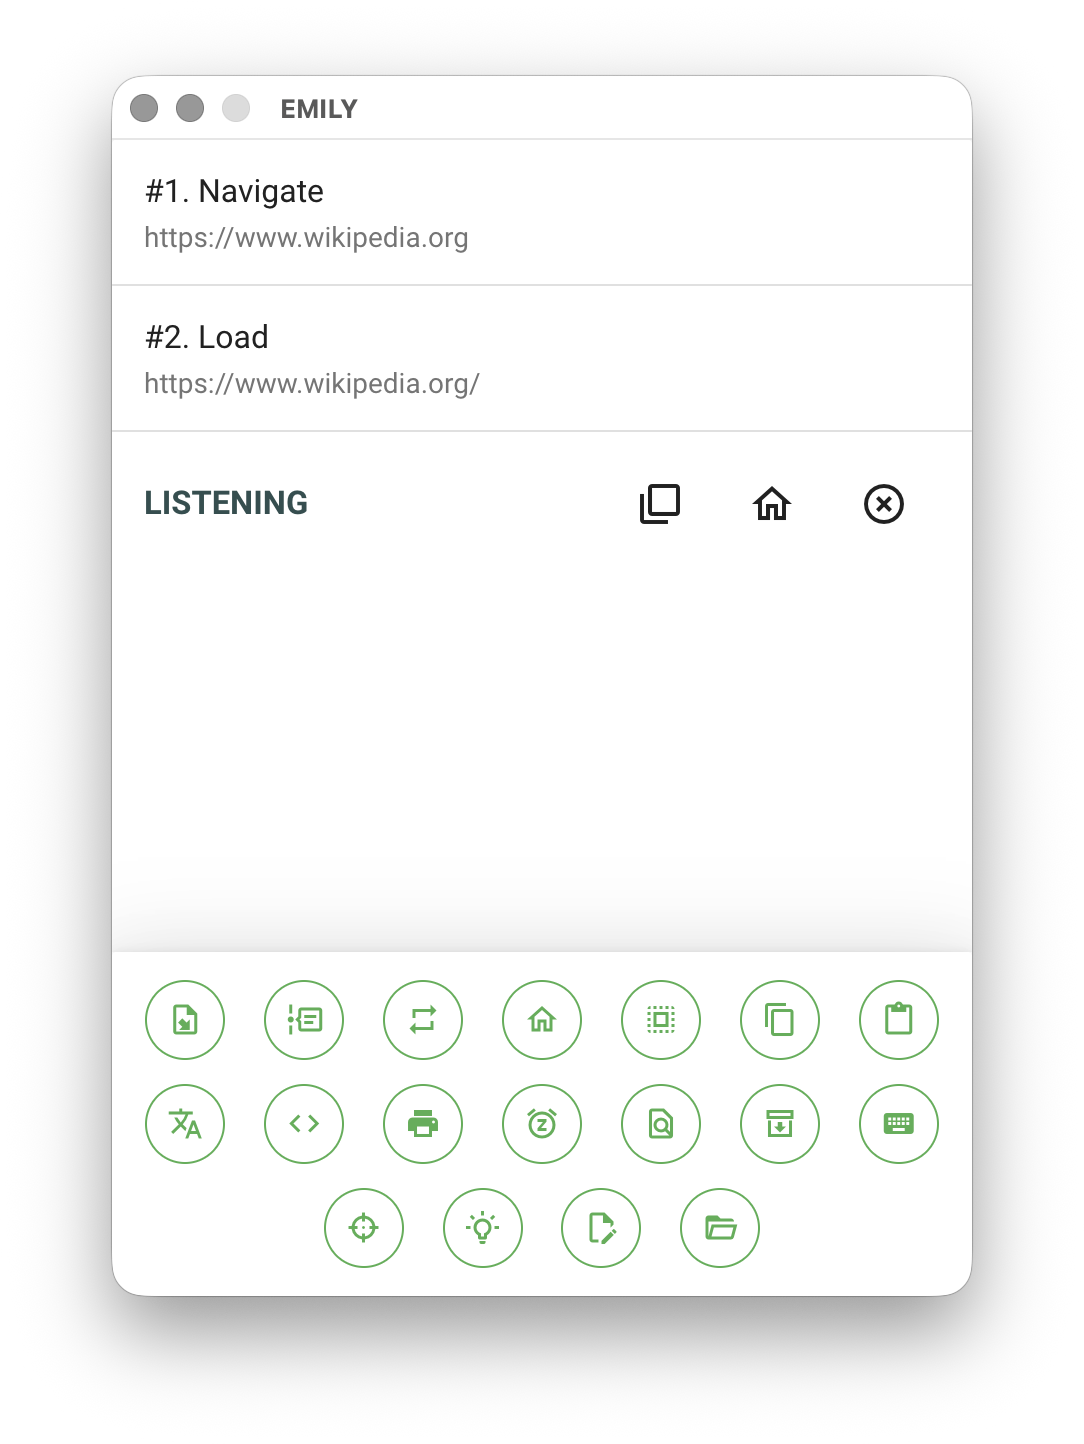
To batch-select multiple commands for deletion or disabling, click "Select Commands" below the command list, then choose the action at the bottom of the interface.
 Import File
Select and import a specified source file into the working folder, with the option to specify the filename within the working folder. The source file field supports the %FILENAME% variable — at runtime, it will be replaced with the content of a TXT file named FILENAME in the working folder, enabling dynamic specification.
 Insert Sub-Skill
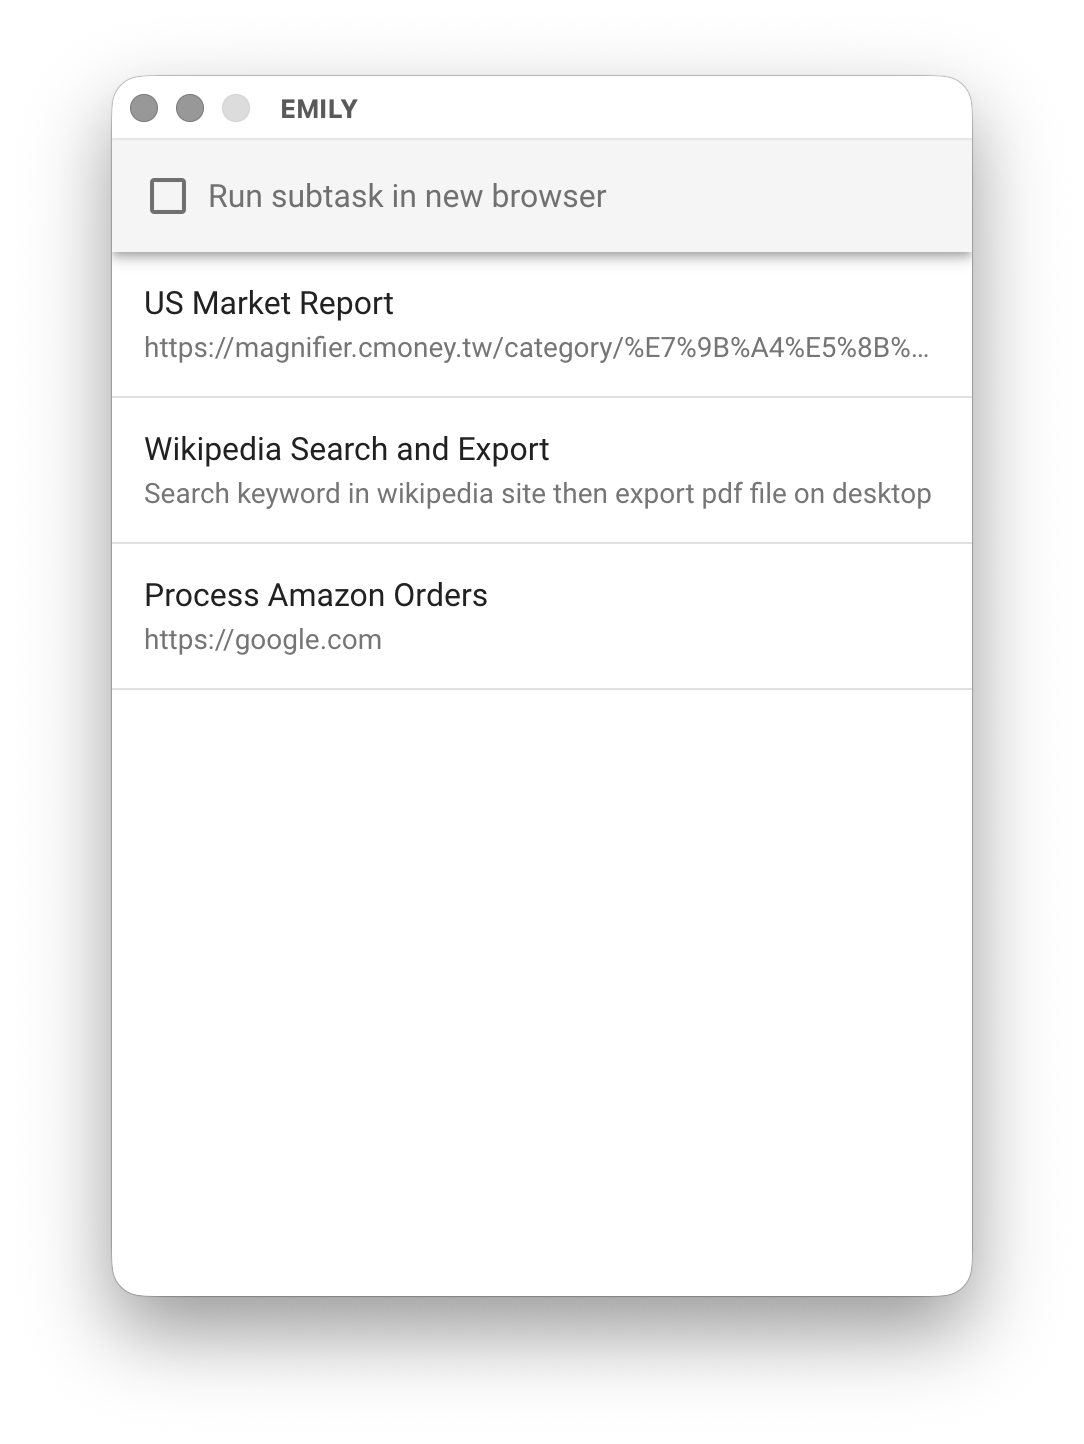
Select a skill and insert it into the workflow as a step. When the EMILY robot reaches this step, it loads and sequentially executes all steps from the sub-skill. Checking Run sub-skill in a new browser opens a new browser window at runtime for the selected sub-skill, which can also have its own independent loop task. If unchecked, the sub-skill runs in the same browser window and must follow the no nested loop tasks rule. Press ESC to cancel inserting a sub-skill.
 Loop Task
Loop Task provides two modes: Table Loop and Conditional Loop, both subject to the no nested loop tasks rule.
Click Loop Task and select a CSV file to enter Table Loop mode. Each field value in the first row of the table is saved as a TXT file in the working folder, named as row-columnName.txt. Users can access these TXT files containing field values and use them in workflow steps within the loop. After recording the loop steps for the first row, EMILY.RPA will execute the loop workflow once for each subsequent row in the CSV during execution mode.
If a TXT file is selected, it enters Conditional Loop mode. Before executing the workflow steps recorded within the loop, it checks whether the content of the specified TXT file meets the configured condition. Once the condition is no longer met, the Loop Task terminates. Therefore, when training workflow steps within the loop, users must explicitly modify the TXT file content according to the desired rules.
 Go to URL
Returns the browser to the Training Mode home page.
 Select All
Selects all text content of the element where the cursor is positioned in the browser.
 Copy
Copy
Copies the selected text in the browser to the clipboard, and optionally saves it as a file in the working folder.
 Paste
Paste
Pastes the text from the clipboard at the current cursor position in the browser.
 Insert Text
Select a TXT file and insert its text content at the current cursor position in the browser.
 Run Script
Select a target node on the webpage in the browser and write a JavaScript script to access it — typically used for fine-grained webpage element manipulation or flexible information extraction. The selected target nodes are represented as the nodes[] array variable in the script. The script supports the lodash.js and moment.js utility libraries, as well as working folder helper functions: read(filename, encoding='utf8'), write(filename, content), remove(filename), repeat(true, delay=3000ms).
// Extract summary content from each news item in a news list
nodes.forEach((node, index) => {
  write('news-' + index + '.txt', node.innerText)
})
If you want to execute a script and wait for asynchronous functions to complete before proceeding to the next automation step, return a Promise object in the script:
// Scroll to the bottom of the page — page data takes a few seconds to fully load
document.querySelector("div.bottom").scrollIntoView()

// Return a Promise object — the next automation step waits until the Promise resolves
return new Promise((resolve) => {
  setTimeout(() => {
    write("page.txt", document.body.innerText)
    document.querySelector("a.nextPage").click()
    resolve()
  }, 5000)
})
Within a script, you can also invoke other skills by their identifier. The invoked skill runs in the current working folder and opens a new browser window, so it is likewise not subject to the no nested loop tasks rule:
// The run() API is asynchronous and returns a Promise — calls can be chained
return run("96fcb9b5-e209-4051-b502-ffd142e31a87")
.then(() => run("bb0a7f40-47e8-40ad-a7f9-d839ee8bcc5d"))
Or download files to the working folder within a script:
// The download(url, filename) API is asynchronous and returns a Promise
return download("https://example.com/pricing.pdf", "price.pdf")
Within a script, you can use the clipboard API to read from or write to the system clipboard:
// Write text to clipboard
clipboard.writeText('hello')

// Read text from clipboard
console.log(clipboard.readText())

// Write HTML to clipboard
clipboard.writeHTML('<p>hello</p>')

// Read HTML from clipboard
console.log(clipboard.readHTML())
If you want to use a script to control the mouse, you can use the following synchronous functions: mouseEnter(node), mouseMove(node, x, y), mouseLeave(node), mouseDown(node, x, y), mouseUp(node, x, y), mouseClick(node), mouseDblClick(node), mouseContextmenu(node, x, y)
// simulate mousedown and mouseup
let node = document.querySelector("BUTTON#send")
mouseDown(node)
mouseUp(node)
You can also use the DA mouse async functions to actually control the mouse or keyboard:
// control mouse actions
return mouse.enable(true)
.then(() => mouse.move(nodes[0], 0, 0))
.then(() => mouse.clickLeft())
.then(() => mouse.enable(false))
// control keyboard actions
await keyboard.enable(true) // enable(true) brings the browser window with touch-guard overlay to the foreground
await keyboard.type('hello') // sequentially sends 'h' 'e' 'l' 'l' 'o' five keys
await sleep(1000) // wait 1000ms
await keyboard.tab() // send TAB key
await keyboard.escape() // send ESC key
await keyboard.backspace() // send BACK SPACE key
await keyboard.enter() // send ENTER key
await keyboard.enable(false)
For scenarios that require clearing browser session data (e.g., cookies), use the clearSessionData() function. Note that clearSessionData() is asynchronous:
// clear browser session data
return clearSessionData()
If you want this script to be executed once more before the next step, use the repeat() function. This function inserts the script again before the next step in the workflow and can be called anywhere within the script:
// If a "Next Page" button is found on the current page, re-execute the script after 5 seconds
let btn = document.querySelector('Button#nextPage')
if (btn) {
  repeat(true, 5000)
  // Click next page after 0.5 seconds to avoid interrupting remaining script work
  _.delay(() => btn.click(), 500)
}
// ...
Scripts can also create MD5, SHA1, SHA256, and SHA512 objects to compute hash and HMAC values:
// Create an MD5 object
let md5 = createHash('MD5')

// Compute MD5 hash value, outputs '5d41402abc4b2a76b9719d911017c592'
md5.hex('hello')

// Compute HMAC value with salt 'key', outputs '04130747afca4d79e32e87cf2104f087'
md5.hex_hmac('key', 'hello')
The async function setUserAgent(agentString) can report a specified browser model for websites that check the browser type:
// Set to Chrome Mac version
await setUserAgent("Mozilla/5.0 (Macintosh; Intel Mac OS X 10_15_7) AppleWebKit/537.36 (KHTML, like Gecko) Chrome/122.0.6261.156 Safari/537.36")
 Print Output
Export the current browser page as a PDF file or send it to a printer.
 Wait Seconds
Tell the EMILY robot to wait the specified number of seconds at this step before continuing execution.
 Delete Step
Delete a step recorded by the EMILY robot.
 Save Content
Use the mouse to select a target node on the browser page, extract the specified type of content, and save it as a local file. The clicked node is highlighted in red. Users can modify the target node path using standard CSS Selectors in the EMILY main window.
When saving text content, if the selected node path is an HTML Table tag and the save filename has a lowercase .csv extension, the EMILY robot will automatically convert the table content into CSV format.
 Send Key
Send one of four keys: ENTER, BACKSPACE, ESCAPE, or TAB (other keys can be entered via Insert Text or directly from the keyboard).
 Wait for Node
Use the mouse to select a target node on the browser page as a checkpoint and specify a timeout in seconds. At runtime, the EMILY robot waits until the selected node appears on the page before continuing; otherwise, it ends with an error status. This is typically used for dynamic webpage operations.
 Guide User
Use the mouse to select a target node on the browser page and enter prompt text. At runtime, the EMILY robot pauses automation at this step, highlights the node in red, and displays the prompt text in the main window to guide the user to take over page operations. After completing the task, click "Done" to let the robot resume automation.
 Rename File
Rename a file in the working folder. The source file field supports the %FILENAME% variable — at runtime, it will be replaced with the content of a TXT file named FILENAME in the working folder, enabling dynamic specification.
 Working Folder
Open the working folder using Windows File Explorer or Mac Finder to inspect the currently stored temporary data.